| |
| |
|
No E-Bay Auctions
at this time |
| |
| |
| |
| |
| |
| |
| Refer
a Friend
Please
|
| |
|
|
|
|
|
| 
IMD4 Decoder Installation for Drop-In
If you are looking for something specific, not shown below,
please use
the
Google Search Link  here,
here,
or the Google search at the bottom of all pages on our site:
If you are
unable to find an item on our site after using the Google
search,
e-mail us and let us know what item you could not locate.
|
Stock
Items!
As much as possible and within the limits of demand
and responsible fiscal management we keep these in
stock |
|
TCS Intermountian IMD4 Decoder for SD45-2
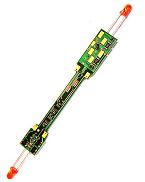
The following pictures are detailed instructions on how to install the IMD4 decoder as a drop-in into the
SD45-2 Intermountian Locomotive
|
Click
on ANY picture to see full size photo

An IMD-4 decoder is the decoder of choice for an Intermountain SD45-2.
Here is the stock chassis below. Notice how close the board comes to the frame near the screws. There are three screws that hold the frame together. One up high by each flywheel and one center under the motor.

It is possible to get the old board out without total disassembly. Loosen the screws almost all the way. Then spread the top of the frame halves open.

Usually you can spread the frame enough to get the board out. (the trucks may fall out)

The old board is out. Now we need to insulate the frame.

Apply Kapton insulating tape on the frames where the motor tabs come up in the center. Also, be sure and insulate the frame humps over the screws (front and back) since they rise up so close to the board.

Intermountain provides a light shield barrel on the old board. Pull it off of the rear LED.

Now take the TCS IMD-4 decoder and place the Intermountain light shield barrel over the rear LED. But be careful. It is rather tight. Since the LED posts are so long, they might bend over when you push on them. I suggest you hold the the posts close to the LED to support them while you push as in the photo below. You could also sand the lip of the LED just a tiny bit.

Push the barrel on most of the way.

You can test fit the board. Make sure that the center shiny tabs that go to the motor are facing down toward the motor. You can see them in the photo below with the slots in them. If you install the board upside down (the wrong way), you'll be able to see these pads on top and the loco will not run. If installed properly, you should not be able to see these pads. Now, if it turns out that your board is too loose in your loco's frame, you can add a bit of solder to the four frame pads to make it fit tighter. I prefer to add the solder to the bottom side as shown here in the photo below.

Here is the decoder fully installed. Notice the Kapton tape over both screw humps.

Now, for the last touch, I decided to gently bend the front LED posts up a bit so that the LED might just be a little bit brighter pointed toward the headlight light tube.

Finished.
|
|
Last Update: Wednesday, March 3, 2010 4:28 PM, By JF
|
|
|
 Wig-Wag, LLC


